FileMaker has always had a special place in the world of software. Its legendary ease-of-use is aimed at letting people gather and manage their data without needing to understand geeky topics. So it makes sense that most upgrades have focused on features that are readily apparent to end users. But FileMaker Pro 14 may be the first upgrade that has more to delight developers’ hearts more than end users’.
FileMaker 14: Performance, Performance, Performance
That’s not to say that end users don’t benefit. FileMaker’s engineering team always knew that FMP 13’s WebDirect technology was a 1.0 release. It was amazing how well it worked, but all those features came at a cost to performance that some users found frustrating. So the great gift to end users is the fine-tuning of FileMaker Server for increased performance. We’ll see some real world figures drifting in over the next few days and weeks, but before release some folks were reporting a 2-3x speed increase in some operations.
Plus, the new Standby Server feature lets you create a second server that can nearly seamlessly take over in case your primary server fails. Neither of these are glamorous features, but they’re the kind of trust-building upgrades a mature software platform has to provide in the competitive world of database apps.
Features to Make Your Developer’s Heart Sing
As with any upgrade, many features are improvements to old standbys. So you can expect the usual influx of new functions (like a suite that lets you control media playback in container fields), and improvements in existing features. But by far, the biggest change, and the one that will inspire the most love—and maybe the most initial frustration—is the ground-up redesign of the old-school Edit Scripts window.
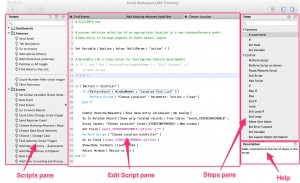
Script Workspace
FileMaker 14’s new Script Workspace is long-awaited upgrade to script writing. All the functions of two dialog boxes have been combined into the new workspace and the menus. Most interactions with the workspace can be issued through the keyboard, instead of the mouse. You can also choose steps’ option with the keyboard — for the most part. Instead of secondary dialog boxes, most options are entered from a popover right in the Edit Script pane. This improvement will lead to faster script writing that’s more like code writing in other platforms. The Script Workspace also includes line numbers to make finding and reading specific sections of your code easier. A new Description area (under the Steps list) will save trips to the Help file if you need a short reminder about what a step is used for.
As welcome as these changes are, the new workflow takes some getting used to. Since you can still point and click, some folks won’t notice the change right way. That’s a good thing for the change-resistant, but it does tend to put the Script Workspace’s light under a bushel.
Here are our tips for learning to use the new Script Workspace without losing your mind.
Specify Calculation Window
The timesaving features of the Script Workspace are also ported to the Specify Calculation window. Select functions by typing, and setup calculations or specify options with keyboard controls. Just start typing the name of your function, and a popover list of functions whose names match your typing appear. When you see the function you need, use the Up or Down arrow keys to select it, and then press Enter. If the function takes parameters, you can just start typing them to see another list.
The popover list of matching functions also includes table and field names. You can enter even the longest fully-qualified field name with just a few keystrokes. For example, if you want to add a reference to the Estimate::Date field, do this:
- Type “e,” then press the Down arrow to select Estimate (your table’s name) from the list.
- Press Enter. “Estimate::” is entered into your calculation. The list automatically shows the fields from Estimate table.
- Use the arrow keys or type a “d” to select the Date field. Press Enter again, and the field reference is complete.
This is one of those shortcuts that takes way longer to describe than to do. And as with the Script Workspace, this keyboard driven assembly will take some getting used to. But after a few hours of practice, you’ll wonder how you ever put up with mouse-based scripting and calculation writing.
Heaven help us all during the switchover period when we’re working in both FileMaker 13 and 14.
Navigation Tools
A new Navigation layout part and the new Button Bar tool lets you create modern navigation bars that float at the top of your layout no matter how far you scroll.
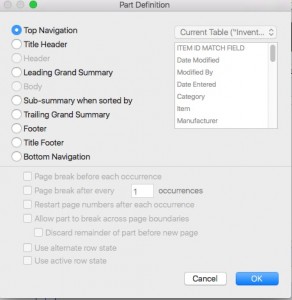
Navigation Parts
There are actually two versions of this new layout part: Top Navigation and Bottom Navigation. Like Headers and Footers, they anchor to the top or bottom of your layouts. Navigation parts don’t print by default, so they behave the way you’d expect them to right out of the box. These parts can’t be scrolled or zoomed, and if you throw a field in one of them, the data from the current record is shown. You can only have one of each part on a layout, but you can create sophisticated navigation systems by putting your main navigation in a Top Nav part, and your context sensitive buttons, or a lower level navigation in a Bottom Nav part.
Button Bars
The new Button Bar tool lets you create several related buttons at one time. Each segment behaves like an individual button and can have its own script or script step attached. You can even mix buttons and popovers in a button bar. So even though FileMaker still doesn’t have templates or master pages, now you can create a navigation or context-sensitive button bar and copy/paste the whole bar to a new layout. This will be another huge timesaver for making your database’s interface more consistent and professional-looking. Here are some other ways Button Bars will make your life easier:
- Button Bars re-size as one unit, so they’ll behave better than single buttons when windows are re-sized.
- Button Bars can have calculated names. That way you can use one bar on layouts used by users with different roles. Your script can check for privilege set before deciding which action to take, and now the button that runs it can display different text to help orient (or train) users.
- All segments of a bar share the same style, which makes consistency easier and more fool-proof (you can’t forget to apply a style to one segment, for example).
- Segments can have their own individual conditional formats.
- Segments can have their own script triggers.
- Segments can be hidden with the “Hide object when” option.
These two navigation improvements don’t stop with making development more efficient. Knowing that you can use Navigation Parts and Button Bars can help you think more clearly about your database’s organization before you even open FileMaker to define your first table. Try sketching out navigation along with your ER diagrams and you’ll start to see how quickly your thinking about how a database will function becomes more clear.
Button Improvements
Even without the new Button Bar, Button handling has been upgraded to let you add text or an icon, or a combination of both. When you display both, you can even choose how the two elements relate to each other—you can put text above or below the icon, or to the right or left of the icon. The Button Setup dialog box comes loaded with a set of icons (called Glyphs) that you can choose. Once you’ve selected an icon, you can resize it with the slider that sits just below the glyph window.

Glyphs appear grey in the dialog box, but are black on the button by default. But you don’t have to live with that color. Glyphs have their own object state. Once you have all the options set in the Button Setup window, travel over to the Inspector, click the Appearance tab, and then change the top object state pop-up to Button: Icon. That’s where you change the glyph’s color to match your color scheme.
If none of the default icons meet your needs, you can add your own custom glyphs, as long as they’re PNG or SVG format. Use the “+” button under the glyph window to import the file.
Note that button glyphs are more than just a convenience. Early testing indicates that glyphs help your layouts render faster than text used as icons (say if you used a “+” symbol from your keyboard instead of the glyph).
Minimalist Styles
FileMaker’s styles are useful for that quick and dirty database you need to throw together in a few hours. But most professional developers create their own custom styles that matches their clients’ branding (or their own). It’s a huge amount of work changing a mature style since every single style—along with all their object states—have to be updated. New themes, called Minimalist and Minimalist Touch, start out with no pre-defined styles except the Default style for each object type. That way, there are no styles to re-define or re-name and no unused custom styles to delete. Just start creating the styles you need.
That old bane Classic style is no longer included in new files you create with FileMaker 14. But you’ll still see it if you convert an old file, either from pre-12 version that had no styles to begin with, or one that created back when Classic was a thing.
FileMaker Go Script Steps
You’ll have more control over your users’ FileMaker Go experience with a few new script steps:
- Set Allowed Orientations lets you limit screen flip on those layouts that you design not to rotate.
- Enable Touch Keyboard lets you enable, or more importantly, disable the touch keyboard. This steps works on FileMaker Go and under Windows 8 touchscreens.
What features are you looking forward to using? Leave a comment or question below.
FileMaker Pro 14: The Missing Manual is now available for pre-order. Set for release May 23, 2015.
Pingback: FileMaker 14 Is Here! - dbhq.net
Pingback: FileMaker 14 Platform learning resources…a list in progress… | New York FileMaker Pro Developers' Group