The post Making the Switch to Script Workspace (Without Losing Your Mind) appeared first on dbhq.net.
]]>Understanding the Script Workspace
The old Manage Scripts window showed a list of scripts and helped you manage them with buttons for creating new scripts and organizing tools like separators and folders. You’d open a new window to work on a specific script, and you could open as many of these Edit Script windows as you needed. Now all those tasks happen in the same window, called Script Workspace.

Figure 1. The Script Workspace now has all the features and tools that used to be distributed over two different dialog boxes. Your main task will be to figure out where your favorite tools have gone.
All the features you’re used to are still available, you just access them differently. Figure 1 shows the new Script Workspace. The left hand pane shows a list of all your scripts. They’re arranged as you would have seen them in FileMaker 13, complete with their folders, separators and menu states. The three tools at the top of the Scripts pane let you manage the list. From left to right, these tools:
- toggle the checkboxes you use to put a script in the Scripts menu
- create a folder
- create a separator
If you click a script, it’ll open in the middle pane. When you have multiple scripts open, they’re arranged in tabs across the top of the pane. You’ll learn some tips for editing scripts later in this article.
Script steps are shown in the right pane. For new users, the handiest feature is the Description box at the bottom, which gives you info about the selected script. You can filter the list of steps with the search field at the top of the list. Tools at the top of the Steps pane let you mark your favorite steps, so that they appear in a special section at the top, and organize the list alphabetically or grouped by function.
The buttons at the upper left of the Script Workspace lets you create new scripts, run the selected script, and start the Debugger (if you have FileMaker Pro Advanced). Buttons in the upper right show script steps’ compatiblity, toggle the Scripts pane, and toggle the Steps pane.
If some of your favorite features seem to be missing, take a look at the menus.

Many of these commands are available through other means in the Script Workspace, like New Script, New Folder, and others. But Grant Full Access Privileges (formerly a checkbox at the bottom of the old Edit Script dialog box) is only available from the Scripts menu.
Don’t forget the View menu, which also changes context when the Script Workspace is active. Again, most of the commands are available directly in the workspace. But the bottom command, called Syntax Coloring, is where you can customize the color coding that makes it easier to read your scripts at a glance.
Syntax Coloring
By default, script steps are now numbered and color coded. To understand what the colors mean, take a look at the Syntac Coloring dialog box shown below.
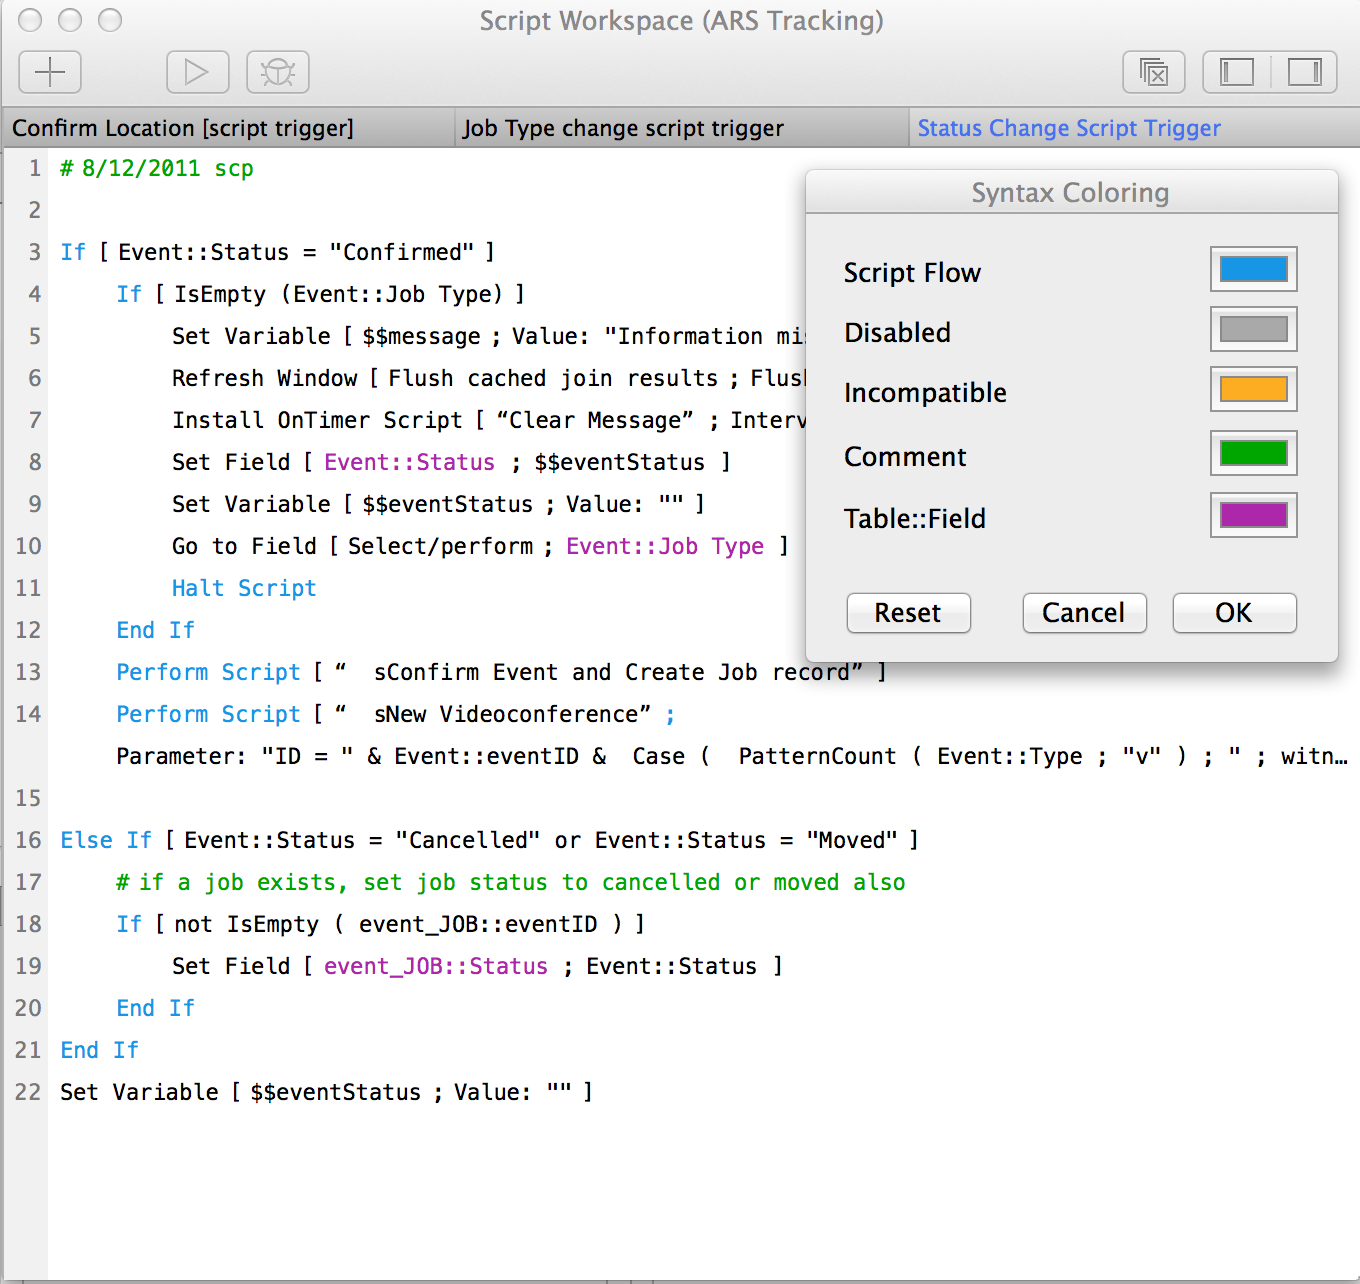
Figure 3. The Syntax Coloring dialog box (shown in a Script Workspace with the Script and Steps panes closed) lets you customize the default colors that appear in the Edit Scripts pane.
Script Flow refers to the script steps found under the Control section of the Steps pane. (Well, most of them: Set Variable, Set Layout Object, and Install OnTimer Script don’t get colored.) They’re the steps you use to perform logical tests, branching, looping, calling subscripts, and other meta functions. By default, those steps are shown in blue.
Disabled and Incompatible script steps are shown in light grey by default. Green steps are comments (text notes that don’t perform any action). Note that the blank spaces in the script shown here are just comment steps with no text. One really nice improvement is that blank comments no longer show the # sign at the left. It’s cleaner — now your scripts’ white space really is a resting point that makes your script easier to read — plus it’s more like other scripting environments. Finally references to schema are shown in purple.
You’re free to change the custom colors any way you want, but the default colors are mostly pretty good. They stand out well from the main code and aren’t too similar to one another. The only exception to that is that Disabled and Incompatible steps are both a light grey color. It’s true that neither item will run when the script is executed, but you may prefer to see a little more warning for incompatible steps, like the orange color shown in Figure 3.
Using the Keyboard
Once you get past the rearranged furniture in the new Script Workspace, you could use it almost the same way as the old, two-dialog box model. That is, if you’re just getting started learning to script, you may depend on the step list to remind you what commands are available for scripting. And once you find what you need, you can point and click to add steps and set their options.
But the real power of the new setup is the keyboard shortcuts you can use instead of your mouse. You can’t throw away your mouse completely, but the new Workspace gets us a long way toward the nirvana of typing code manually. Here’s a list of handy keyboard shortcuts for writing scripts without the mouse:
- Enter or Return key. If no steps are selected, the Enter or Return key adds a new line at the bottom of your script. If a step is selected, the new line appears below the highlighted step. Shift + Enter/Return adds the new line above the highlighted step.
- Use the Up and Down arrow keys to move the highlight through the script.
- Hold the Shift key with the Up/Down arrows to select multiple, contiguous lines.
- Move selected script steps with Command + Ctrl + Up (or Down) arrow keys.
- The curly braces let you move through the open script tabs in the Edit Script pane. Command + { moves to the next tab, and Command + } moves to the previous tab on the Mac. Use the Ctrl keys instead on Windows.
- Close a Script tab with Command + W (Mac) or Ctrl + W (Windows).
- To add a step to your script, create a new line and then start typing the step’s name.
Did you get the importance of that last item? You can add steps to a script just by typing! This is probably the most important upgrade in FileMaker Pro 14 because of the time it will save developers by typing instead of reaching for a mouse. Here’s how it works: once you start typing in a new line, a popover list appears showing all the steps that match your text. So if you want to add a Set Field step, create a new line and then type “set f.” A list appears below the new line, and it’s filtered by what you type.

Once the step you need appears on the list, use the arrow keys to highlight it, and then hit the Enter key to add it to your script. Then hit Enter again to show the step’s options. Use the Spacebar to option an option’s dialog box. When a step has more than one option (for example, the Set Field step has a Specify target field option and a Calculated result option), use the Up/Down arrow keys to move between options. When you’re done setting all a step’s options, you can de-select it with the Escape key, or by creating a new line.
But maybe you think the typing “set f” is too much work. Then you can type the first letters of the name of the step you need. In other words, type “sf” and the list is filtered to show all steps that have any words that begin with both an “s” and an “f” and in that order (Constrain Found Set has words that start with “s” and “f,” but it won’t appear in the list because “Found” comes before “Set” in this step). This rule is harder to explain than to understand. But for those steps you use often, like Go To Related Record or an If test, you’ll soon be typing away without thinking about it.
It’ll take some practice to get all these tricks to become second nature. But most experienced developers report that they’re already writing scripts much more quickly than they used to, and that they’re not nearly as efficient when they have to work in FileMaker Pro 13.
Disabling script steps
The Workspace giveth and the Workspace taketh away. Several of standby favorite commands aren’t nearly as accessible as they used to be. For instance, you can still disable script steps, but it’s gonna take you a while to find the command. Select the step(s) you want to disable, and then choose Edit > Disable. Reverse the process to enable a step.
Fortunately, there’s a keyboard shortcut you can use instead. On the Mac, Command + / (forward slash) toggles your highlighted steps. Use Control + / on Windows.
Note: If you can’t find this command, you may be working with FileMaker Pro. Disabling script steps is one of the developer tools in FileMaker Pro Advanced.
The post Making the Switch to Script Workspace (Without Losing Your Mind) appeared first on dbhq.net.
]]>The post Give Users Feedback with Merge Variables appeared first on dbhq.net.
]]>Fortunately FileMaker gives you other ways to give users dynamic information without using a pesky dialog box. You can set your message into a merge variable with an install timer script set, and then clear it back out again with a second one. This process is so useful that we include a pair of scripts for this purpose in every database we design.
Here are the steps you can use to set a message:
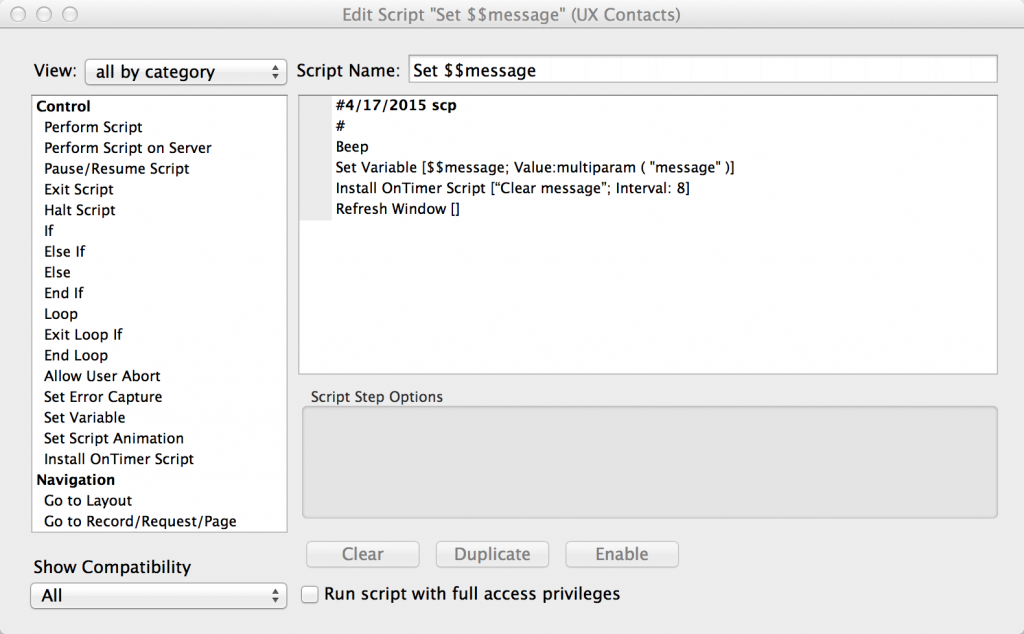
It’s a good idea to give users audio AND visual feedback, so the script starts with a beep step to get their attention. Then it parses out a message that you send to the script as a parameter. If you’re using the method described in the link above, your message needs a name and value pair, separated by an equals sign. Use this syntax:
message = Email Sent
And to make sure users don’t have to hunt all over their interface to read the message, put the merge variable in the same spot on every layout. This should be such a integrated part of your design routine that that you plan for it from the beginning of a project. Figure out where to put the merge variable, and then format it with whatever red color you’ve chosen for the solution to give another type of feedback that says: This message is important.
So this short little script makes a noise, shows a brief message, and then does its own housekeeping so the user doesn’t have to do anything to make the message go away again.
Here’s the script you can use to clean up afterwards:
![]()
The post Give Users Feedback with Merge Variables appeared first on dbhq.net.
]]>The post Multiple Parameters for Scripts appeared first on dbhq.net.
]]>For simplicity and clarity, we started with the SeedCode custom function, but changed the name from SeedCode_GetScriptParameter to MultiParam. The new name name is shorter, to the point, and reminds you what the function does. At DBHQ, we use this custom function in every database we create. It’s a building block which will be used in other script examples on this blog.
In fact, because we do use MultiParam in every database we create, you’ll probably see us employ it even when a script only needs one parameter and Get ( ScriptParameter ) would suffice. The logic behind this is that it’s much easier to use MultiParam (even when you only have one parameter) than to go back and retrofit if you later decide that your script is going to need more than one parameter in certain circumstances.
The function lets you create name/value pairs, separated by a semicolon. First you pass the values into the script using the “optional script parameter” field when you specify the script you’re running. Type:
“action = start ; status = active”
In the code above, the word “action” is the name of a thing you’re passing. Its value is “start.” The semicolon marks the end of the first pair. Note that the spaces around the “=” and the semicolon are for legibility. If you just run the code together, the custom function will still work, but your parameter isn’t as easy to read.
After you’ve passed the parameters, you’ll use Set variable script steps, one for each parameter you’ve passed, to read and store the values within a script:
Set variable [$action = MultiParam ( “action” )]
Set variable [$status = MultiParam ( “status” )]
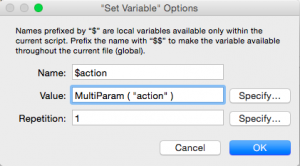
In this example, $action is will have a value of “start” and $status will have a value of “active”.
To use a field name in the script parameter instead of static text, use standard FileMaker concatenation:
” action = start ; status = ” & Customer::Status
You can string together as many parameters as you need for your script. Here’s one with three parameters, using a field in the second to illustrate how to construct the parameter when you introduce a field name in the center of it.
“action = start ; status = ” & Customer::Status & ” ; state = ” & Customer::State
Refer to “Creating Custom Functions” (ADD LINK) to see the steps to add this custom function to your database.
The MultiParam function itself has one parameter (Name). The MultiParam function should be made available to all accounts.
—————-BEGIN CODE—————————
/*
Name:
SeedCode_GetScriptParameter
History:
Created by John Sindelar, SeedCode LLC, based on Anton Anderson’s FileMaker Advisor Article of Dec 2005.
www.seedcode.com
Creation Date: 26 Dec 2005
Last Modified Date: 21 Jan 2006
Purpose:
Returns just the named parameter when multiple parameters are passed into a script.
Parameters:
Name
Example:
SeedCode_GetScriptParameter ( “Operation” ) returns “begin” when the script parameter is “Operation = Begin ; Status = Estimate”.
Requires Other Custom Functions:
None
Other Notes:
Where “Name” is the name in a Name/Value pair like: “Operation = Begin”.
Separate Name/Value pairs with semicolons like: “Operation = Begin ; Status = Estimate”.
Quotes are optional in the value: “Operation = Begin ; Response = \”OK\””
Fields can be entered like this: “Operation = Begin ; Status = ” & job::status
If a requested value is not present, the result is blank.
Options:
None
*/
Let ( [
string = Substitute ( Get ( ScriptParameter ) ; [ “\”” ; “^^” ] ; [ ” ;” ; “;” ] ; [ “;” ; “\” ;” ] ; [ “= ” ; “=” ] ; [“=” ; ” = \”” ] ; [“¶” ; “~~” ] ) & “\”” ;
eval = Evaluate ( “Let ( [” & string & “] ;” & Name & ” )” ) ;
result = Substitute ( eval ; [ “^^” ; “\”” ] ; [ “~~” ; “¶” ] )
] ;
If ( result =”?” ; “” ; result )
)
—————-END CODE—————————
The post Multiple Parameters for Scripts appeared first on dbhq.net.
]]>